Unified Installer
Overview
Purpose of Enterprise Unified Setup
SPEECHEXEC ENTERPRISE UNIFIED SETUP (or UNIFIED SETUP), available starting with SPEECHEXEC ENTERPRISE 8.1, provides a quick and consolidated setup experience to install the most frequently used software components of the SpeechExec Enterprise ecosystem on one host computer. UNIFIED SETUP also aims to reduce manual, post-installation system configuration by automatically storing shared system settings in various configuration files.
Installed software components
The Unified Setup always installs the following components: - A central configuration folder (SEEROOT), containing configuration files used by most Enterprise software components - ENTERPRISE LICENSE SERVER - ENTERPRISE MANAGER - .NET FRAMEWORK 4.8 Depending on user selection, the UNIFIED SETUP can also install the following optional components: - WORKFLOW MANAGER - SPEECH RECOGNITION SERVICE - ENTERPRISE APP INTERFACE - DICTATION STATISTICS access from ENTERPRISE MANAGER
Unsupported installation scenarios
Upgrade from version 8.0 and below : Upgrading Enterprise components with version 8.0 and below is not supported using the UNIFIED SETUP.
Upgrade Enterprise components not installed with Unified Setup: Enterprise components that can be installed using the UNIFIED SETUP can also be deployed using a dedicated, application-specific installer. Upgrading an application using the UNIFIED SETUP, which was installed with the application-specific installer is not supported.
Installing software components on multiple computers
UNIFIED SETUP is designed to provide a streamlined, simple installation experience. Using the UNIFIED SETUP assumes that all installed components will be installed and used from one computer.
Note
Using the individual installers of SPEECHEXEC ENTERPRISE components, it is possible and supported to distribute various SPEECHEXEC ENTERPRISE software among multiple computers if the environment requires that.
Silent installation of the Unified Setup
The UNIFIED SETUP does not support silent installation.
Before installation
Prepare folder for central configuration files:
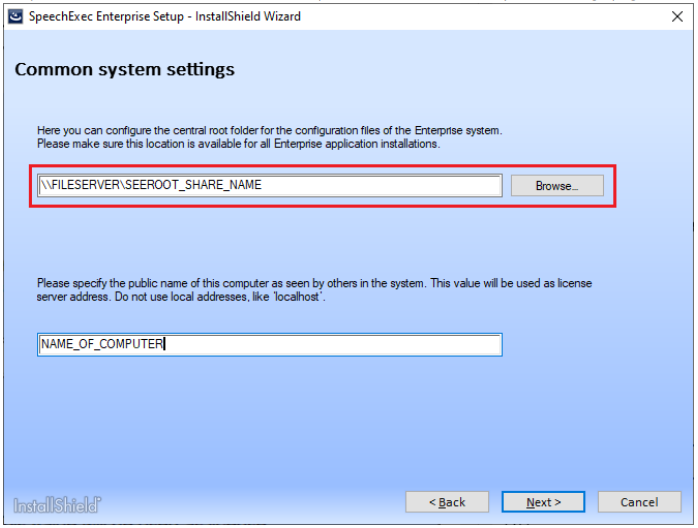
Most SpeechExec Enterprise applications use and store system and user configuration settings in various configuration files. These configuration files are usually shared by multiple applications, therefore need to be accessible in a central, shared location. This location is usually a folder stored in a network location, accessible as a network share. The full path of this network share needs to be specified on the Common system settings page:
Before starting UNIFIED SETUP, it is recommended to perform the following steps:
Create an empty folder at the desired location, for example "C:\SEEROOT", to hold the Enterprise configuration folders and fil
Make sure that the contents of the folder are accessible (readable and writable) by setting appropriate folder and file permissions:
Select the name of the folder in Windows Explorer Right-click the folder, choose Properties Go to the Security tab Set folder and file permissions
If needed, share this folder for network access:
Select the name of the folder in Windows Explorer Right-click the folder, choose Properties Go to the Sharing tab Click Advanced sharing Enable the Share this folder checkbox Specify a Share name Specify network access permissions by clicking on Permissions button Make sure all user accounts and groups that need access to central configuration files are listed here and have the proper share permissions
Allow incoming ports in firewall
Before installation, make sure that the following ports are open in the local firewall:

Prepare a service logon user account
Some selectable components are Windows services, and they require an existing domain user account to log on with. This domain user account must have the following file access privileges: - Read access to the central configuration folder (SEEROOT) - Read/write/delete access to any folder (or network share) that contains dictation files to be processed by the given Windows service
To give these permissions, perform the following steps for each folder: 1. In Windows explorer, right-click on the SEEROOT folder and select Properties 2. Select the Sharing tab and click on Advanced sharing... 3. Check the Share this folder checkbox 4. Click on Permissions 5. Click on Add… and search for your desired domain user account on the displayed dialog:

6. Click the OK button 7. Select required permissions for the user • Full control permission is recommended for the SEEROOT folder • Full Control permission is required for folders containing dictation files

8. Close all dialogs with the OK button
Installation process
With the Unified Installer you start a new installation of the most used SEE components. Unified installer installs the same individual software versions as the standalone installer.
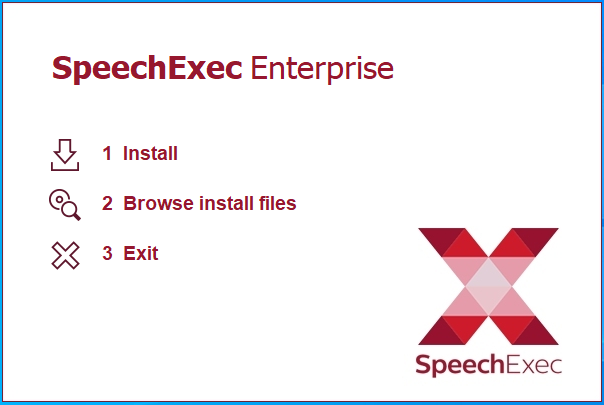
To start the installation open the folder \Unified\01\ and start the installation with the autorun.exe

Click on Install to start the installation
Select the language. You can select between Dutch, English, Finnish, French, German, Norwegian and Spanish. Click on Next to select additional components for the installation. Standard installation contain SpeechExec Enterprise license server and Enterprise Manager.

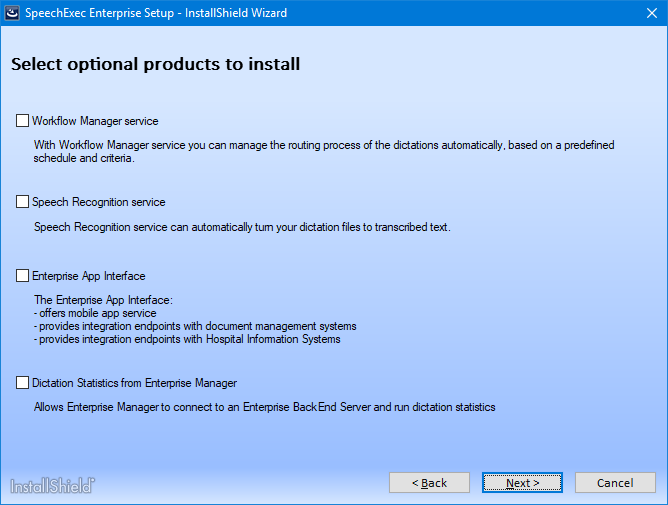
Now you can select the optional components. Further use of these components may depend on the license level agreement. For our standard installation we will only install the two main components.
Select the central root folder for all the configuration files of the Enterprise system. You can select a local folder or available network folder. Make sure that the folder SEEROOT is accessible for everyone. In our example we use a local folder on the current computer. License server is installed with current computer name.
Note
Please do not use a localhost name

Other example for installation with root folder what is accessible via a network share.

Click on Install to start the process. After that we will need a few more configuration steps which we will describe in detail.

The installation process was completed.

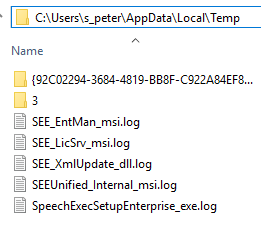
The installation was also logged in the background, the individual log files can be found in the folder: C:\Users\USERNAME\AppData\Local\Temp\