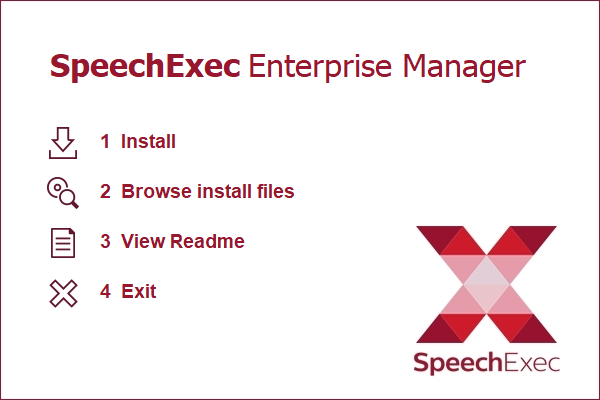
Enterprise Manager
The SpeechExec Enterprise Manager is the interface where the background configuration of the Enterprise solution happens.
The user interface is divided into two groups of tools.
System Management Center
System Administration
License Administration
Advanced Administration Tools
Dictation Statistics
Workflow Manager
Before starting the installation of the Enterprise Manager, please make sure you have configured two shared folder for your users:
SpeechExec Enterprise Configuration Root folder (SEERoot folder)
Dictations folder
Installation Process
We recommend installing the Enterprise Manager on the Microsoft Windows Server as for client operating systems the number of concurrent network connections is limited.
This chapter describes the installation process of SpeechExec Enterprise Manager on Windows Server 2019. To start the installation process open the Folder Western/01_Foundation/03_Enterprise_Manager.
Select the executable autorun file.
Click Install to run the installation wizard.
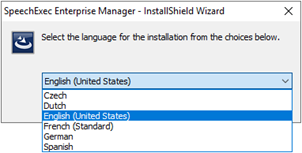
Select your preferred language from available: Czech, Dutch, English, French, German and Spanish
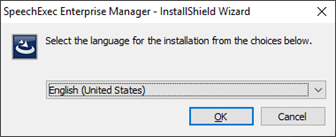
Click OK to select the language for installation
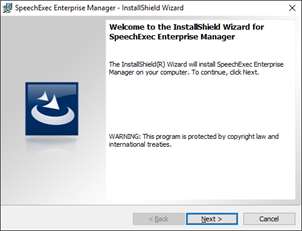
Click on Next
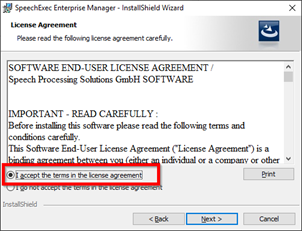
Accept the terms in the license agreement and click on Next.
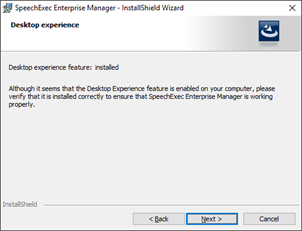
The Installer recognised that the desktop experience feature is installed, click on Next. If Desktop experience is not available on your machine, please Cancel the installation and kindly check if your environment meets the system requirements.
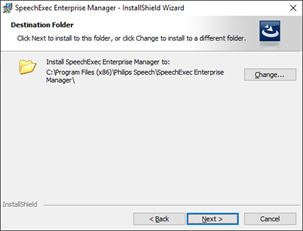
You can change the destination folder for the installation, we recommend you use the default setting, and click on Next.
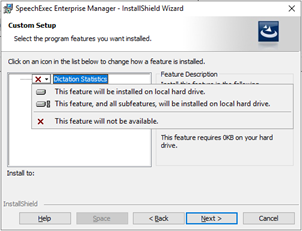
If you want to use Statistics for dictation and transcription modules later, you can activate the option – Dictation Statistics. Proceed by clicking on Next.
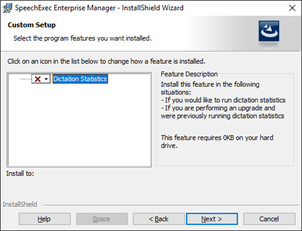
If you don't need this, you can disable it here
You can also created new SEE_Root Folder for the all configuration files created during the installation of the SpeechExec Enterprise Manager and all other end-user modules like SpeechExec Enterprise Dictate or SpeechExec Enterprise Transcribe.
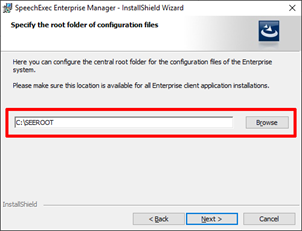
Click on Browse to select local or network folder for the configurations files.
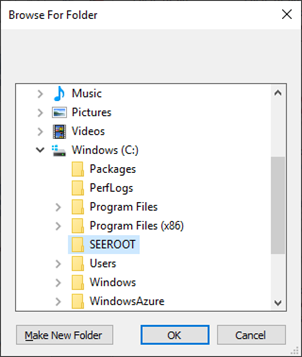
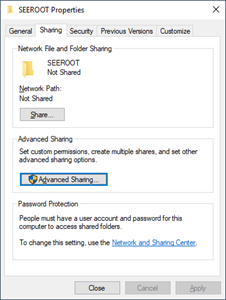
Important: Make sure that the folder SEEROOT is accessible for everyone. Search for the SEEROOT folder, click on this with the right mouse button select and click on Properties.
Click on Advanced Sharing
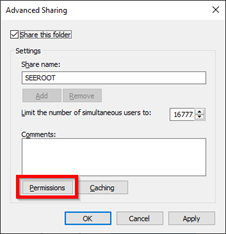
click on Permission
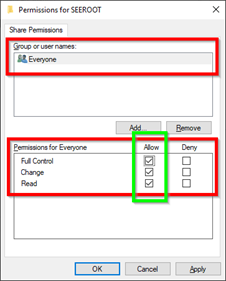
check the permission for EVERYONE
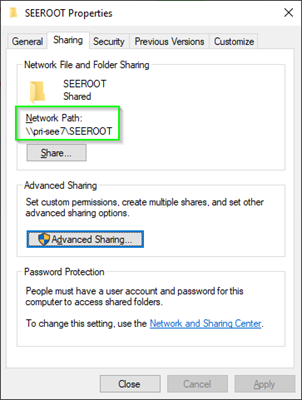
Now you see te network share name, in our example \\pri-see7\SEEROOT.
If you also want to configure the hardware remotely, you can also install the Remote device management software at the same time. Please note that you may need an additional license.
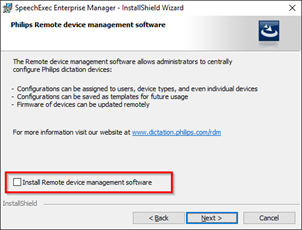
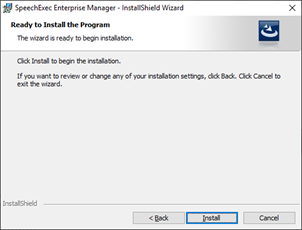
Installation process can be started, using the preconfigured settings, click Install.
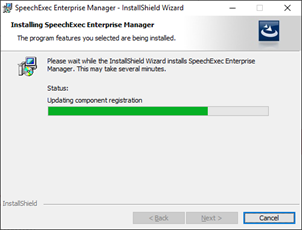
Installationsprocess is running.
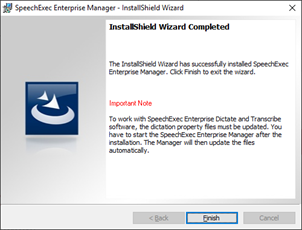
Click Finish to close the SpeechExec Enterprise Manager installer.
Enterprise Manager Configuration
This chapter describes a best practice configuration of SpeechExec Enterprise Manager.
Run the SpeechExec Enterprise Manager
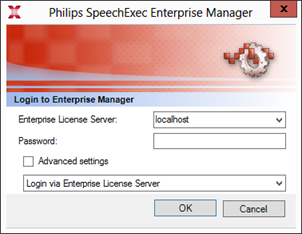
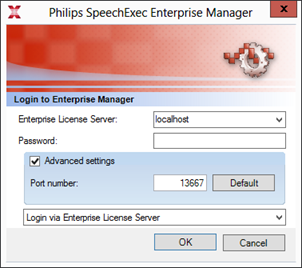
Enter the IP address or name of the Enterprise License Server, the Password Field is empty.
Standard connection
Connection with different License Server settings
Login via Active Directory
After launching the Enterprise manager application, select Login with Active Directory credentials from the combo-box, enter the required information in the appropriate fields and click OK. For more information – please read Chapter – Login with Active Directory

SEE Manager main menu
The main window of the SpeechExec Enterprise Manager application enables administrators to start Enterprise Manager Tools. The main window contains a menu bar, a menu of the applications of the Enterprise Manager – System Administration and License Administration, and an explanation area for the application.

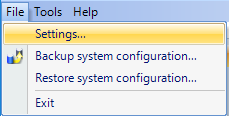
The menu bar provides menu commands for settings configuration files, starting applications. SpeechExec Enterprise Manager provides the following menus in the Menu bar:
• Settings – specify the path of the system configuration
• Backup system configuration – specify the path of the backup file. The files of the current system configuration can be saved in a .zip file for reference purposes or security reasons.
• Exit – close the SpeechExec Enterprise Manager window.
• System Administration – start the System Administration • License Administration – start the License Administration • Dictation Statistic – start the Dictation Statistic. • Workflow Manager – start the Workflow Manager
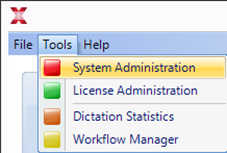
To use the Dictation Statistic module the application needs a StatisticsCAL license type from the Enterprise License Server specified during the startup.
Backup system configuration
The files of the current system configuration can be saved in a .zip file for reference purposes or security reasons.
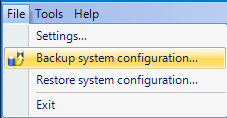
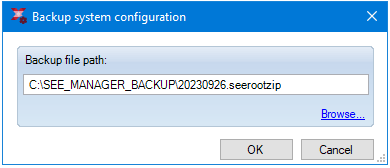
Specify the path and name of the backup file using the Backup system configuration option in the File menu. All the necessary system configuration files with the current folder structure are backed up.
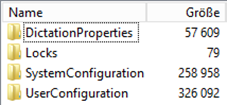
The Backup zip file contains four folders and files: • DictationProperties PSP.SpeechExec.DictationPropConfiguration.xml • Locks SE_EM.lock • SystemConfiguration
Contains folder UserToMobileDeviceAssignment with the related xml file, groups xml file, PSP.SpeechExec.SupportedAudioFormats.xml PSP.SpeechExec.SystemDefaultSettings.xml SpeechExecEnterprise.groups SpeechExecEnterpriseConfigurationRoot.settings userrelationships • UserConfiguration UserName.xml
Restore system configuration
To restore a previously saved system configuration, select Restore system configuration from the File menu, which opens the Restore system configuration dialog.
Warning
The entire contents of the central configuration folder will be overwritten!
To restore the system configuration, the following actions must be taken:
Create a new backup of the current system configuration.
Shut down all services that use the central configuration folder specified above.
The central configuration folder has been defined during the installation of the Enterprise Manager and end-user modules.
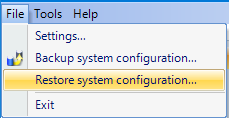

Accept the confirmation statements by selecting the check boxes. Choose the backup file that you want to restore with the Browse for backup package file... button. If the selected zip file is valid, you can start restoring the system configuration with the Run import... button. For security reasons, the original folders are renamed (date-time postfix is added), and the selected backup folders are extracted with the original name.
In the text box, you can see the system notifications: result of the operations and possible error messages.
Restoring system configuration manually To restore the files manually, go to the zipped backup files and copy the extracted files to the root folder keeping the folder structure.
Notice
Close the Enterprise Manager and client applications.
If the original files are not lost, save them to another location so that you do not lose any configurations by overwriting the files with the backup files. If the root folder is also lost, create a new root folder at the same location where it has been before. This is important because the SpeechExec Enterprise Dictate and SpeechExec Enterprise Transcribe applications use the same root folder as Enterprise Manager. If a different root folder is created for the restored files, your system configuration settings will not be applicable in the client applications.
Change Root Folder path
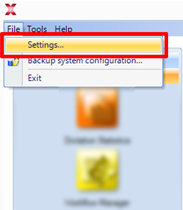
Click on File, select Settings
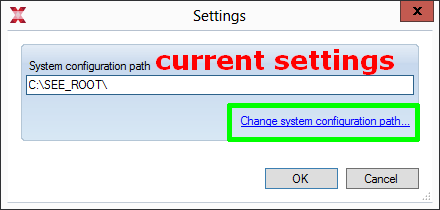
click on Change system configuration path…
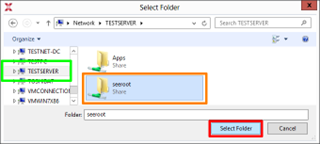
Select the SERVER, click on the available folder (seeroot) and click on Select Folder.
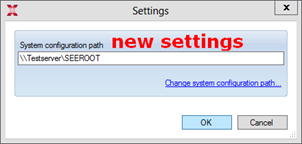
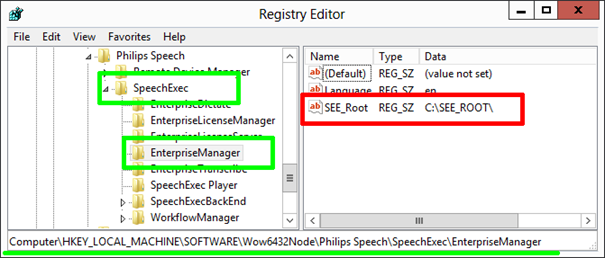
This path is saved in to registry key named
Computer\HKEY_LOCAL_MACHINE\SOFTWARE\Wow6432Node\Philips Speech\SpeechExec\ EnterpriseManager
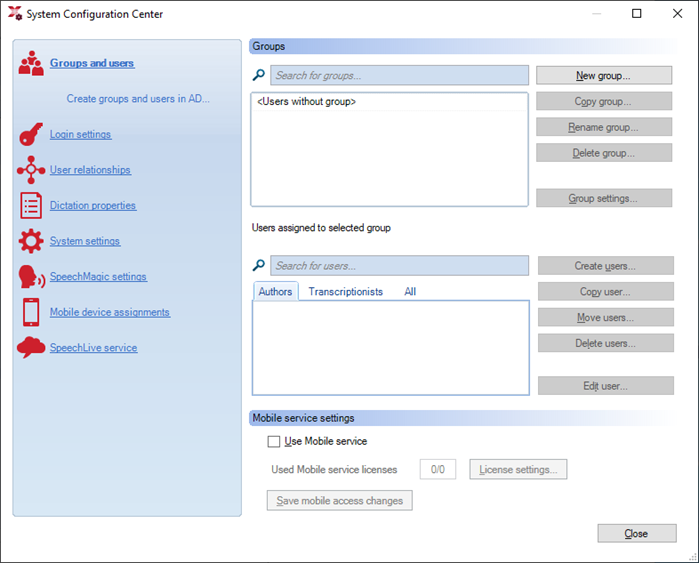
System Configuration Center
Description
The SpeechExec Enterprise System Configuration Center allows the management of groups and users, the definition of dictation properties and login settings and the management of user relationships. Default settings can be defined for all users before using one of the SpeechExec Modules like Dictate or Transcribe and also later if any system-wide default settings or user configuration settings need an update.
You can define whether settings should be locked or user modification is allowed. If settings are locked, end users, who perhaps are unfamiliar with system parameters and business requirements, cannot change the settings. Also, some settings can be locked while others can be allowed for modification. This means that individual users can change some of the settings themselves.
Groups and users
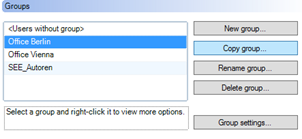
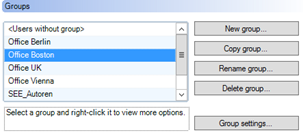
The list of groups shows the existing groups and the default group Users without group which contains users that are not assigned to any other group. Under Groups, the following settings can be defined for groups:
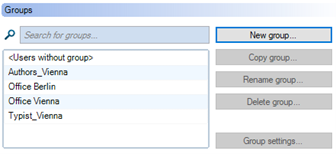
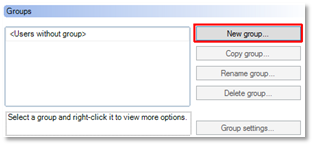
New group - create new groups.
Copy group – copy existing groups.
Rename group – modify the name of the group with the rename group button.
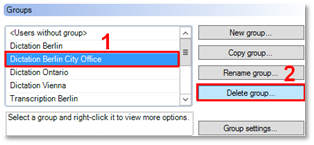
Delete group – select a group and click the button to delete the group.
Group settings – select a group to edit the default properties of the group. With this application administrators can organize users of the system into groups so that the users of a group have common settings. On this page we describe step-by-step settings for groups and for the users of a group with the following possibilities:
Groups Level
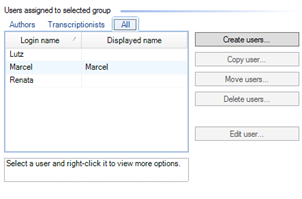
Users Level
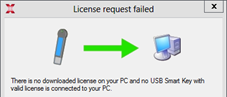
User without groups
For the first start please configure the group called Users without group. You can recognize that this is not configured during the first start of SpeechExec Enterprise Dictate or Transcribe.
Open the System Configuration Center, select from the right menu area Groups and users, and click on Users without group then click on Group settings
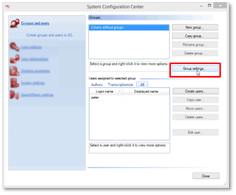
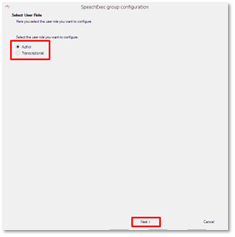
Select Author or Transcriptionist role for the user and click on Next. Click on the Enterprise menu point, select Licensing and add the host name or IP address for the computer with License server. Click on Next and finalise this with Finish.
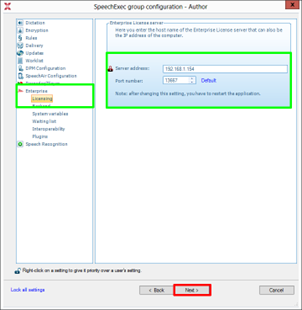
Now, if you start again the SpeechExec Enterprise Dictate the license is retrieved from License Server and Software started without problems.

Create new groups
Create a new group with the New group... button.
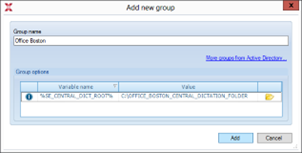
When the Add new group dialog is displayed, enter the name of the group in the Group name field manually or click More groups from Active Directory... and select a group from the Active Directory. Here you can also specify the value of the %SE_CENTRAL_DICT_ROOT% system variable, however, it can also be left empty and added on the System variables page in Enterprise in the SpeechExec System Configuration Wizard.
Note
A common default root path can also be defined for all newly created groups by specifying the %SE_CENTRAL_DICT_ROOT% system variable on the System settings page.
When the Add new group dialog is displayed, enter the name of the group in the Group name field manually or click More groups from Active Directory … and select a group from the Active Directory. Here you can also specify the value of the %SE_CENTRAL_DICT_ROOT% system variable, hovewer; it can also be left empty and added on the System variables page in Enterprise in the SpeechExecExec System Configuration Wizard. New group
Available groups
Note
A common default root path can also be defined for all newly created groups by specifying the %SE_CENTRAL_DICT_ROOT% system variable on the System settings page.
Copy group
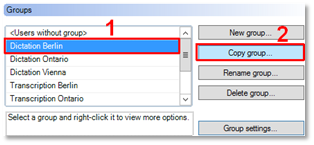
Copy existing groups with the Copy group button. The group settings will be the same for the new group, but no users will be assigned to it. The default properties of the group can be changed if necessary with the System Configuration Wizard.
Select one of available group [1]
Click on Copy group [2]
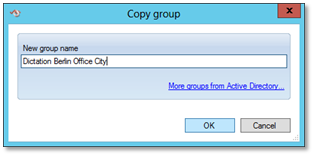
Create the new group name and click on OK
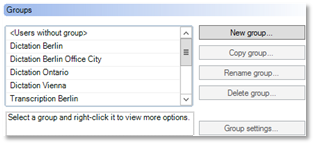
New group is available
Rename group
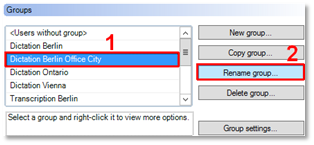
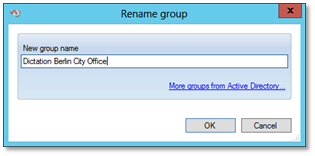
Modify the name of the group with the Rename group button. When the Rename group dialog is displayed, modify the name of the group in the New group name field manually or click More groups from Active Directory... and select a group from the Active Directory.
Notice
The default group cannot be renamed.
Select one of available group for rename [1]
and click on Rename group [2]
Create new group name and click on OK
Delete group
Select a group [1]
and click the Delete group ... [2] button to delete the group.
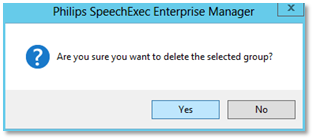
A prompt will confirm the deletion of the group.
Notice
The default group (Users without group) cannot be deleted.
Group settings
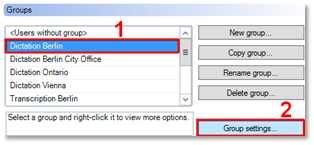
Select a group [1]
and click the Group settings… [2] button to edit the default properties of the group.
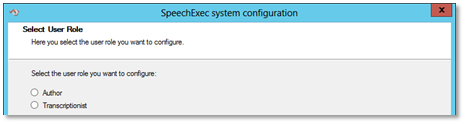
This opens the SpeechExec System Configuration Wizard.
On this page, select the user role to be configured.
Author – a user who uses SpeechExec Enterprise Dictate software to record dictation files
Transcriptionist – a user who uses SpeechExec Enterprise Transcribe software to transcribe the dictation files.
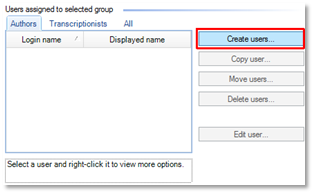
Create users
To assign users to a group manually, choose Create user...
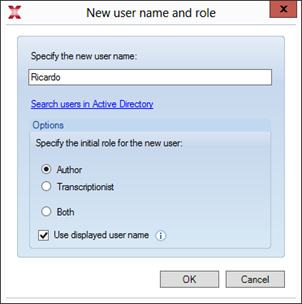
In the New user name and role dialog, specify the name of the new user and the initial user role. Users can also be searched in the Active Directory.
To assign users to a group from the Active Directory, choose Create new users from AD groups...
Select the role of the new users (Author, Transcriptionist or Both) and click OK.
In the Create new users from AD groups dialog, choose the group in which the users are listed, then select the users from the list and click OK.
An already existing user configuration can be used as a template for newly created users by clicking the desired user from the combo-box under Settings.
Note
The Do not use template user option is selected by default.
If the "real" user name is to be displayed instead of the login name, the Use displayed user name option should be activated. This option can be automatically activated by enabling the Use displayed user name(s) when creating new user(s) option on the System settings page.
Note
When a new author is created, a Confidential folder and a My Transcriptionist folder is also created for the user along with the other folders. These folders together with the Finished dictations folder can be linked with the transcriptionist's pending dictations folder through the User relationships tool.
Copy users
Copy existing users by selecting them [1] and clicking the Copy user [2] button.
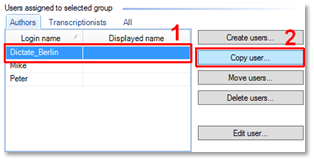
The user settings will be the same for the new user and can be changed if necessary with the User Configuration Wizard.
Move users
Move users to an existing group by selecting the users [1]
and clicking the Move users [2] button.
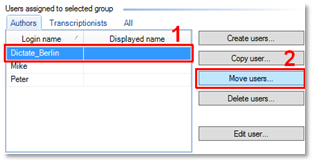
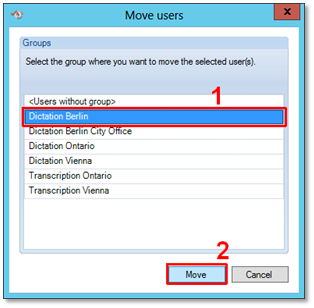
When the Move users dialog is displayed, select the group [1] where the selected users should be moved and click Move [2].
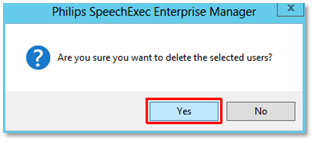
Delete users
Delete users from a group by selecting the users [1]
and clicking the Delete users [2]... button.
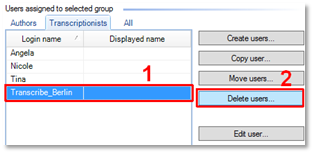
You are asked to confirm the deletion.
Edit users
Select a user [1]
and click the Edit user [2]... button to personalize the system-wide default settings for individual SpeechExec end users (authors and transcriptionists).
The user configuration settings define how end users interact with SpeechExec.
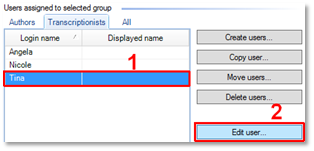
This Edit user… button opens the SpeechExec user Configuration Wizard.

Login settings
The application enables defining the way users are identified when starting Enterprise Dictate and Enterprise Transcribe. Under Login settings, check the current login settings or define the settings for the login configuration of users by clicking on Edit login settings…
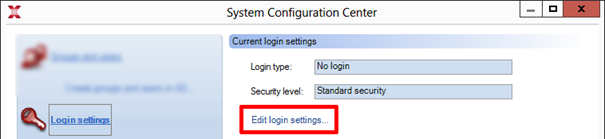
On this page, define the settings for the login configuration.
Login type Here you can specify the type of the login to the Enterprise Dictate and Enterprise Transcribe applications.
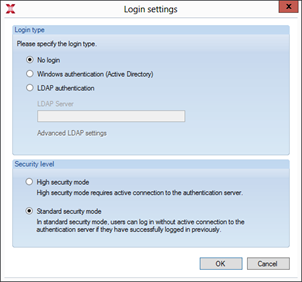
No login - allows starting the Enterprise Dictate and Enterprise Transcribe applications without logging in. Windows authentication (Active Directory) - allows login for the users of the Active Directory. SpeechExec authenticates users in the current Windows domain. LDAP authentication - allows login only for the users of a specified LDAP server by entering the name of the LDAP server. Under Advanced LDAP settings, you can also enter the LDAP connection string and test the LDAP authentication with the current settings. Note: If LDAP login authentication is used with Active Directory server, apply Ntlm as authentication type, otherwise, apply Basic. Security level - here you can specify the security level of the user login. High security mode - requires active connection to the authentication server.
Standard security mode - in standard security mode, users can log in without active connection to the authentication server if they have successfully logged in previously. Use this security mode when users do not always have access to the authentication server; for example, when working out of office.
User relationships
With this application, administrators can link transcriptionists to authors by linking the pending dictations folder of the transcriptionists to the folder where the finished dictation files are saved at the author.
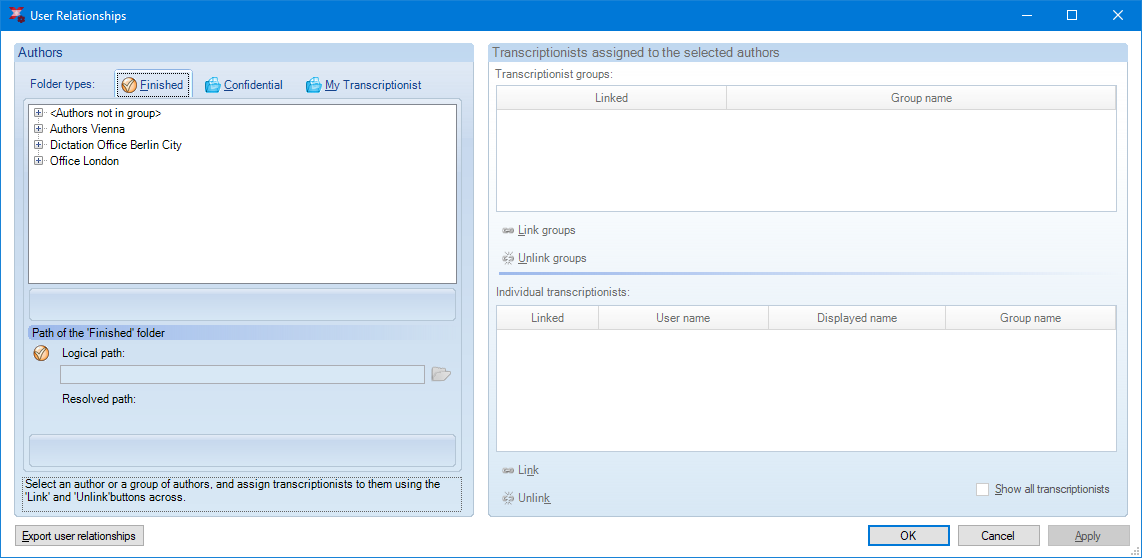
Example: Author - Finished dictations folder: \\SERVER\A_FINISHED Transcriptionist - pending dictations folder: \\SERVER\A_FINISHED Note: This application can be used only in Simple operating mode. When transcriptionists are linked to authors, new pending dictation folders are created automatically on the transcriptionist side for each author. Name of the linked folder: Pending author name, Confidential author name (for example, Pending Author1, Confidential Author2).
The settings of the linked transcriptionist folders are locked.
These folders cannot be deleted and their path cannot be changed by the users in order to avoid broken links.
To create relationships, or modify existing ones, click Edit relationships... on this page.
Dictation properties
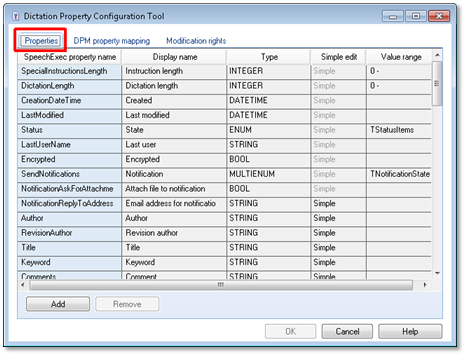
On this page you can configure dictation properties for the system. Dictation properties provide various types of information about a dictation, for example, Dictation length, Author, Priority. Some dictation properties are filled in by the system and some require input by a user.
SpeechExec is delivered with a set of default dictation properties. These properties are stored in the dictation properties configuration file stored in the central root folder of the system. Under Dictation properties, system-wide dictation properties can be edited and group-specific property values can be customized.
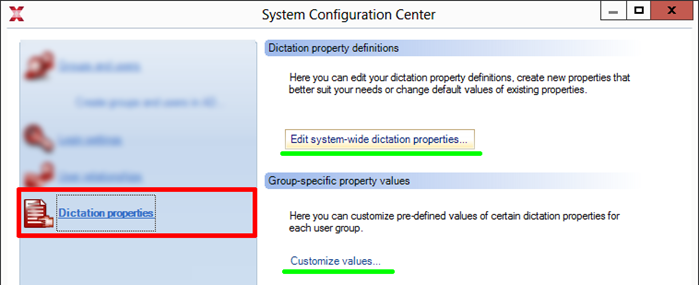
With this tool the following actions can be taken: Change the label (the displayed property name) of any dictation property. For example, Title can be changed to Case number. Define which properties are mandatory - the user who works on the dictation must fill in all properties defined as mandatory. Define which properties are editable by which user role - for example, you can make settings that enable the transcriptionists to add information in the
Comments property. Add and delete additional custom dictation properties - for example, you can add a work type property. Note: You cannot delete any default properties delivered with SpeechExec. Modify the mapping of Digital Pocket Memo Keywords with SpeechExec dictation properties. For example, DPM Keyword 3 is associated by default with the SpeechExec dictation property Comment. You can modify this mapping so that DPM Keyword 3 is associated with a custom added dictation property Patient ID. Customize group-specific values for custom dictation properties. Users of a group can select from a set of values specific only to their group and not to the entire system.
Dictation property definitions
All dictation properties in the configuration file are listed here (default and custom properties). The dictation properties are the following: · Property name: the internal - name of the property; it is read-only · Display name: the field name that the users see in the Worklist module. To edit the Display name click in the field and define a new name for the property. · Type: the type of the property The following types of property are available: BOOL - the user selects Yes or No DATE - the user enters a date DATETIME - the user enters a date and time DIRECTORY - browsing for a folder is possible ENUM - single selection from a menu is possible FILE - browsing for a file is possible FLOAT - numbers including decimal values INTEGER - numbers MULTIENUM - multiple selection from a menu is possible STRING - characters (words and numbers)
Simple edit: can be selected if the property type is STRING Using STRING in simple edit is the old way, where users type the string property. By unchecking simple edit, you can add a string list to the property which shows up and users can decide to accept one of the pre-defined values or type a new one. Value range: depends on the type of property that you have selected
Each property has a system defined identifier which is read-only.
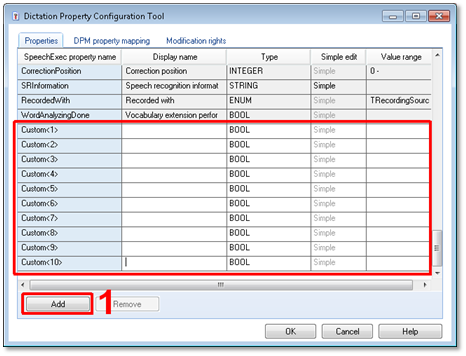
Add - with this option you can create any property dictated by the business and user needs. Click the Add [1] button. A new line appears in the list with the Property name automatically assigned. Fill in all columns in the row.
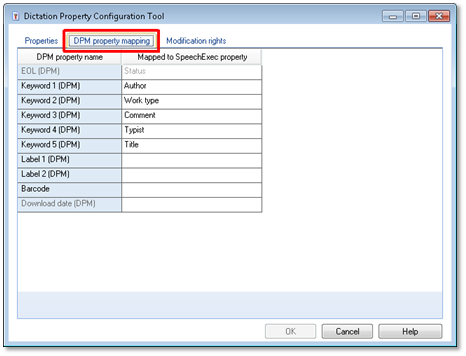
When dictation files are downloaded from the Digital Pocket Memo to SpeechExec, properties which are set by configuring the Digital Pocket Memo can be associated with SpeechExec properties. For example, the content string of DPM Keyword 1 is by default associated with the SpeechExec property Author. Not all Digital Pocket Memo properties have to be mapped to SpeechExec properties. Note: It is possible to map two Digital Pocket Memo properties to the same SpeechExec property, however it is not advisable, as information might be overwritten.
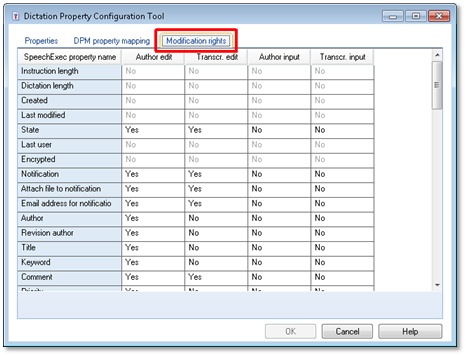
You can specify, by user role, which dictation properties are editable by the user and which are mandatory. The property field of editable properties can be edited by the user. To make a property editable by the author and/or transcriptionist set the Author edit and/or Transcriptionist edit columns to Yes. Mandatory properties for an author must be filled in when creating a dictation file. Mandatory properties for a transcriptionist must be filled in when opening a dictation file for transcription. To make a property mandatory for the author and/or transcriptionist set the Author input and/or Transcriptionist input columns to Yes.
Group-specific property values
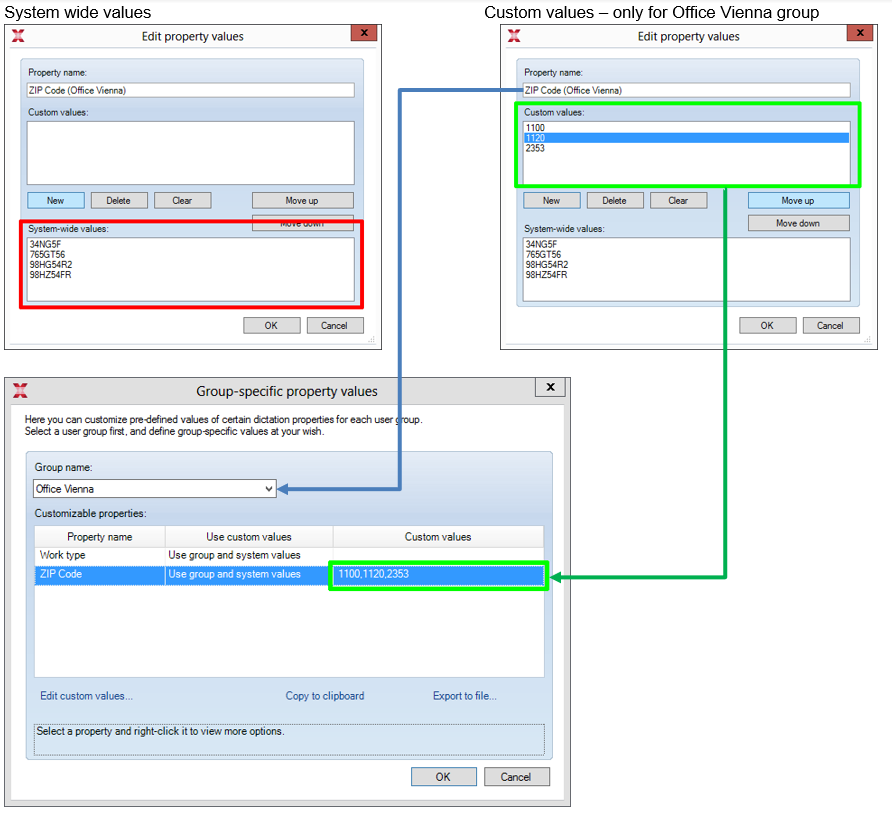
On this page pre-defined values of dictation properties can be customized for each user group. Note: Special pre-defined values can only be specified for custom properties created with the Dictation Property Configuration Tool (Edit system-wide dictation properties... option) with STRING type and value range (not Simple edit). To customize the property values of a group: Select the necessary group [1] in the Group name combo-box. Customizing group-specific values can also be done from the Groups and users function, by right-clicking on the required group name and choosing Edit custom dictation properties from the drop-down menu. The customizable properties of the selected group are listed [2].
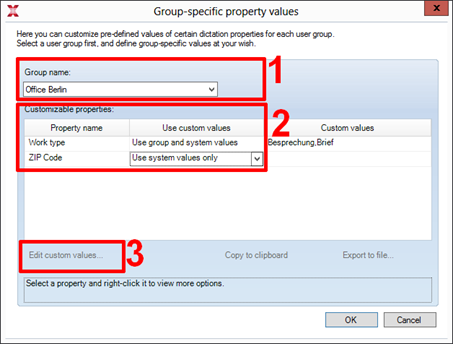
To add group-specific values to a custom property, select the required property under Customizable properties and click the Edit custom values [3]... button. In the Edit property values dialog, the property name with the selected group name is displayed. If system-wide values have been added with the Dictation Property Configuration Tool, those values are displayed as read-only under System-wide values. Click New to add group-specific values for the specified property of the specified group.
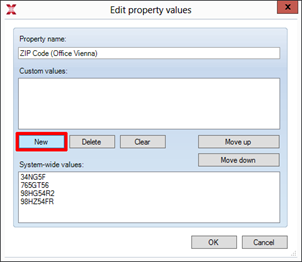
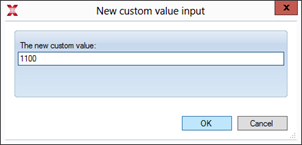
You can delete a value with the Delete button or clear all values with the Clear button. The order of the group-specific values can also be changed with the Move up and Move down buttons to get the desired order of values in the end-user modules. The values of a custom property can either be inserted into a text editor (for example, Notepad) by clicking Copy custom values or exported into a specified .txt file by clicking Export custom values. Click OK to save the changes on the custom values. In the Use custom values column define whether the end-user should use only group values (Use group values only), system values (Use system values only) or both values (Use group and system values). If no group values are specified, Use systems values only is set automatically. Click OK to save the changes on the customizable properties of the required group.
System settings
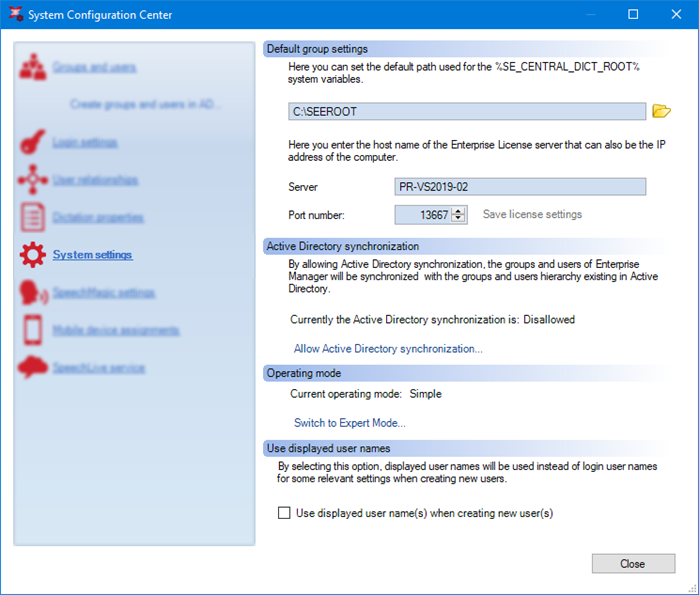
The System settings node provides you with the below adjustment possibilities centralized in one place:
Default group settings
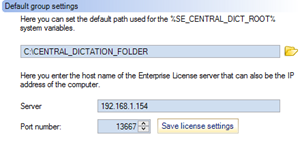
Here you are enabled to set a common default root path for all newly created groups by specifying the %SE_CENTRAL_DICT_ROOT% system variable. By leaving this field empty, the value of the %SE_CENTRAL_DICT_ROOT% has to be defined manually for each and every new group either in the Add new group dialog during group creation or on the System variables page in Enterprise in the System Configuration Wizard. Here you are also enabled to set a common SpeechExec Enterprise License server address and port number for all newly created groups. However, it can also be specified separately for each group on the Licensing page in Enterprise in the System Configuration Wizard. Save the new settings by clicking the Save license settings button. Note: These specifications have no influence on the settings of the already exisiting groups.
Active Directory synchronization The Active Directory Synchronization feature can only operate if it is explicitly allowed by clicking the Allow Active Directory synchronization... button.
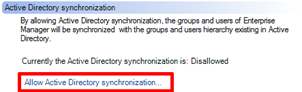
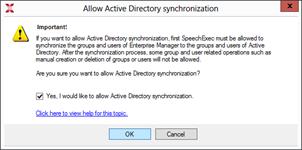
Note: While it is running, the Enterprise Manager application will be locked and other users will not be able to change any settings. Activate field – Yes, I would like to allow Active Directory synchronization and click on OK
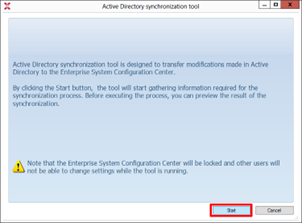
Active Directory Synchronization feature Click the Start button to manage group membership of users by synchronizing the groups and users of Active Directory to the groups and users of Enterprise Manager. During this action, some restrictions take effect and none of the following operations can be performed: creation, deletion and copying of groups and users modification of group names displacement of users to another group
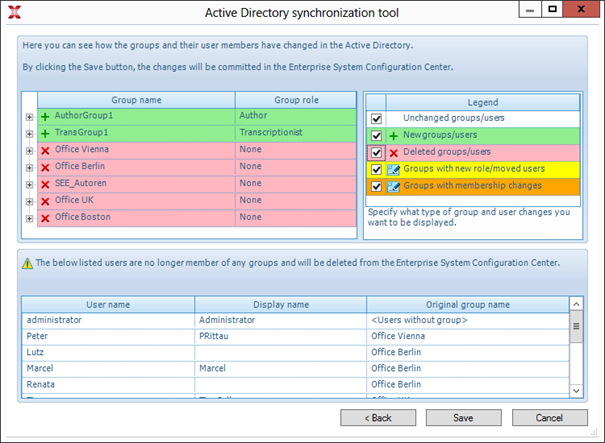
Operating mode The operating mode is a constant system setting that covers all users who work within one system. The current operating mode is indicated in the bottom-left side panel of the System Configuration Center window. The Enterprise system can operate in simple or expert mode.

Note: It is possible to switch from simple mode to expert mode, but reverting back to simple mode is not allowed. Simple operating mode- -when the Enterprise system is newly installed, it will operate in simple mode. When the system is upgraded or previous configuration files have been migrated, the system will operate in expert mode. In simple operating mode, authors and transcriptionists can be linked by the administrator under the User relationships option. Note: In simple operating mode, manual modification of the following folders is prohibited for individual users: Author role: Finished dictations, Confidential, My Transcriptionist Transcriptionist role: Pending dictations Expert operating mode -in expert operating mode, no restrictions are made on modifying the folder paths of authors and transcriptionists; however, the Edit relationships option is not available. To switch to expert mode, click the Switch to Expert Mode button. Note: When changing the folder path of an author that is linked to a transcriptionist, also change the folder path of the linked transcriptionist folder. Otherwise, the transcriptionist will not receive the dictation files from the author. User name appearance - here you are able to decide on the appearance of new user names during their creation. Use displayed user name(s) when creating new user(s). Activate this option to display the "real" name of all newly created users. In the case of users with author role, it means the adjustment of the default profile name and the default author property name. In the case of users with transcriptionist role, it means the adjustment of the custom user name of the user who worked on the dictation file last.
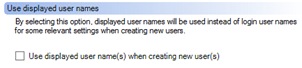
Note: Until the deactivation of this option, the Use displayed user name option will be automatically enabled in the New user name and role dialog of the User Configuration Wizard.
SpeechMagic setings
The SpeechMagic settings node provides the following options: define the SpeechMagic servers that will be queried when a user in SpeechExec is searching for SpeechMagic user profiles create SpeechExec users from SpeechMagic user profiles
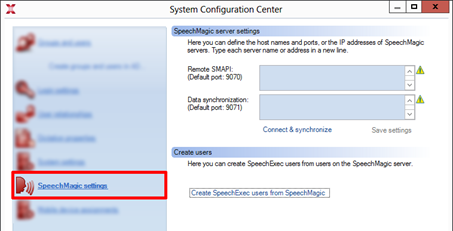
Remote SMAPI - the host name and port number of your SpeechMagic servers that are validated before synchronization. You can also enter the IP address of your servers in IPv4 format. Define each server in a new line. Defining a port number is optional. SpeechExec uses the default port if you do not define one.

Data synchronization - the host name and port number of your SpeechMagic servers that will be synchronized. You can also type the IP address of your servers in IPv4 format. Define each server in a new line.

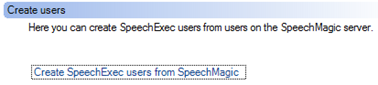
Click Save settings to save your changes in the server lists. Click Connect and synchronize to connect to your SpeechMagic servers and synchronize SpeechMagic ConTexts. A list will show you the result of your synchronization where you can see the available ConTexts and whether a server is unavailable for some reason. The newly synchronized ConTexts are available on the General Settings > Speech Recognition > Profile settings page in SpeechExec Enterprise. You can create SpeechExec users from SpeechMagic profiles. On the SpeechMagic settings page, click Create users from SpeechMagic. The Import SpeechMagic users wizard is displayed. Select a SpeechExec Group name where you want to add your new users. Click Next. A list of available SpeechMagic users is displayed. Select the SpeechMagic users that you want to import to SpeechExec. You select a user either by marking a checkbox in the Import column or by selecting multiple lines in the list and then clicking Mark all selected for importing. Click Start to import users. A confirmation message is displayed when users are created.
Mobile device assignments
If you have Philips SpeechExec Mobile Server installed, mobile device assignment in SpeechExec is essential for your administrator.
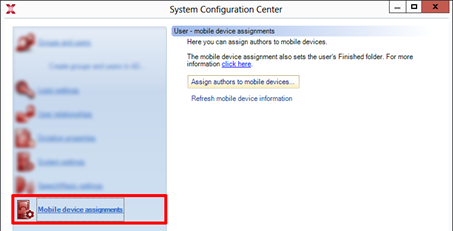
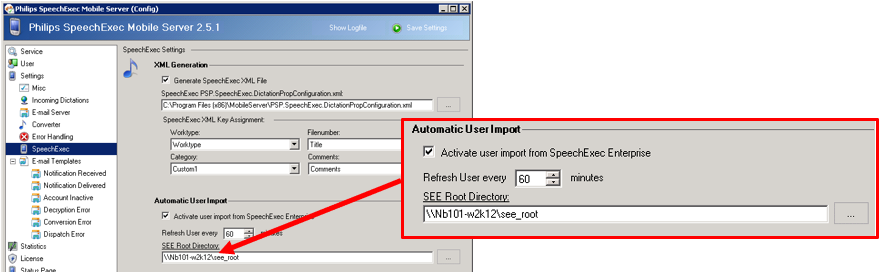
Note: This page is only available for administrators with full rights. When you assign mobile devices to users, you essentially create a package of user details that you can synchronize with the Mobile Server. To synchronize user data, the administrator first enters user’s details in SpeechExec Enterprise, which generates an XML file that stores these data. The administrator then logs in to the Philips SpeechExec Mobile Server and imports the user data, by specifying the path to the SpeechExec Enterprise central system configuration folder. How to edit mobile devices assignments In the Assign authors to mobile devices window, you see the users of all groups. The author name and assigned mobile device are listed for each user. To edit mobile devices assignments, do the following: Select an author in the Assign authors to mobile devices window that you want to edit, – eg. Marcel. Click Edit mobile device assignments or double-click the name of an author. The details of authors are taken from the Active Directory, and the only detail you can change is the email address. To add or modify a mobile device ID, click a row below Mobile device IDs and enter the identifier of the device. You can delete device assignments by selecting a mobile device ID and clicking Delete. Edit mobile device assignments The details of authors are taken from the Active Directory, and the only detail you can change is the email address.
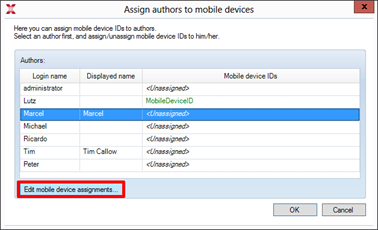
To add or modify a mobile device ID, click a row below Mobile device IDs and enter the identifier of the device. You can delete device assignments by selecting a mobile device ID and clicking Delete.

Edit mobile device assignments
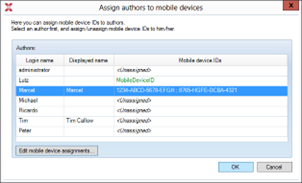
The details of authors are taken from the Active Directory, and the only detail you can change is the email address. To add or modify a mobile device ID, click a row below Mobile device IDs and enter the identifier of the device. You can delete device assignments by selecting a mobile device ID and clicking Delete. Save your changes when you are done.
This will update the UserToMobileDeviceAssignment.xml file (located in the folder SEE_ROOT\SystemConfiguration\UserToMobileDeviceAssignment\) that Mobile Server reads.
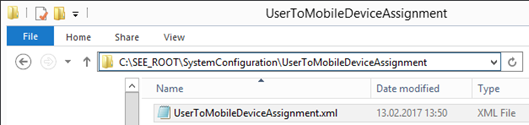
Save your changes when you are done. XML file content:
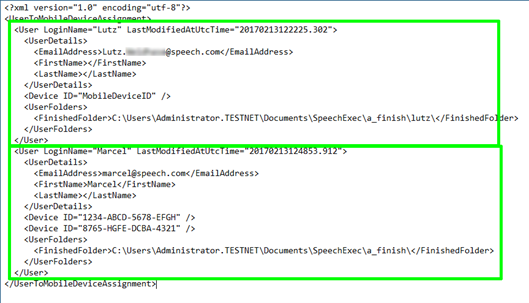
The administrator logs in to the Philips SpeechExec Mobile Server and imports the user data, by specifying the path to the SpeechExec Enterprise central system configuration folder.
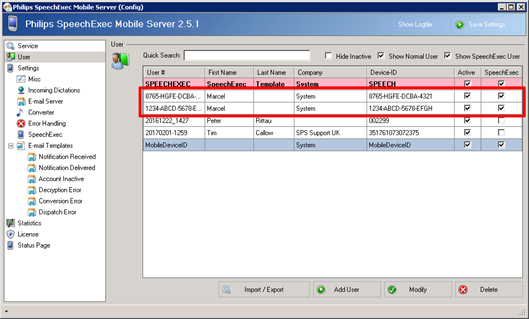
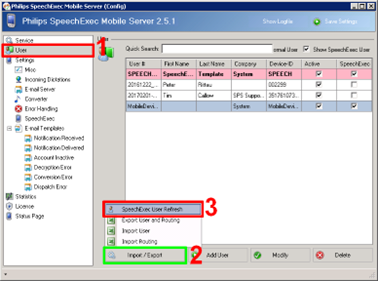
Click on User, select Import / Export and click on SpeechExec User Refresh. Log file is visible – for the user: Marcel we receive two devices ID 1234-ABCD-5678-EFGH and 8765-HGFE-DCBA-4321.
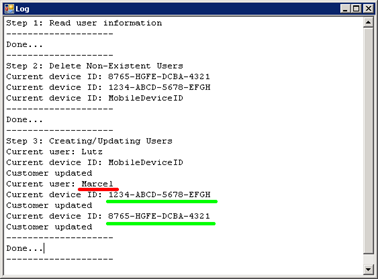
The system create automatically two account for the different Device ID