Transcription Module
Installation Transcription Module
This chapter describes the installation process of SpeechExec Enterprise Transcribe
Open the 01_Enterprise_Foundation folder and double click on 05_Enterprise_Transcribe
Double click on Autorun to start the installer
Click Install.

Select your preferred language from available: Czech, Dutch, English, French, German and Spanish.
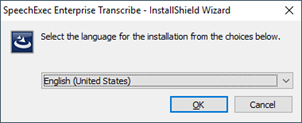
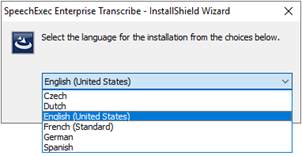
Installshield is preparing the files for installation. Click Next to start the installation process

Accept the license agreement and click Next.
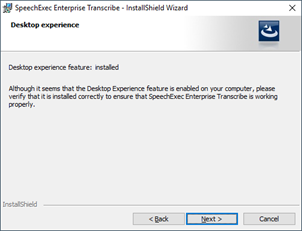
Desktop experience is installed, click on NEXT

Select additional features and click on Next.

Configure the central location of the system configuration folder

Click Install

Installation process is running.

Click Finish to exit the wizard. The installation procedure requires a reboot. Make sure that the same administrator user, who installed SpeechExec initially, also logs on after the reboot for the installation to be completed properly. If a different user tries to log on after the reboot, a dialog will be displayed which prompts for the administrator user to log on again.

Menu structure
File

Start transcription - opens the selected dictation. If more than one file in your Worklist is selected, the first selected file is opened. Depending on your personal settings or preconfigured settings, a word processor is also opened.
Playback Starts playback of the selected dictation file. If more than one file in your dictation list is selected, the first selected file is played back. Select the menu command again to stop playback.
Play special instruction - starts playback of the special instruction associated with the dictation. If more than one file in your dictation list is selected, the first selected file is played back. Special instructions are saved in a separate file from the dictation file; playing back a special instruction does not open the dictation file.
Submit for email - sends the selected dictation via email. If email settings have been configured, these settings are used. If more than one dictation is selected, all are sent as email attachments. Only one dictation file can be sent per email. If you select more than one, the email sending dialog will appear for each dictation file. The subject will be filled in automatically with the dictation file name.
Send and receive - connects to the email system or the FTP server, checks for incoming emails or files, and sends the outgoing ones.
Import - displays the dialog for importing files created outside SpeechExec.
Synchronize - synchronizes the network folders with the contents of the Local Work folder. Dictation files which you have been working on locally are moved to folders on the network. When selecting this option, the Synchronization dialog is displayed, where you can define the destination folder for the files.
Start download from recorder - starts download from the recorder. A pop-up window appears, showing the list of files available for download. You can select the files that you want to download from the recorder to your PC.
Note
This option is only available if the recorder is connected to your PC.
Un-archive dictation - if you accidentally finish a transcription, and SpeechExec moves the dictation file to the Archive folder (if the corresponding setting is enabled) you can recover the dictation file from the Archive folder and move it to the Suspended folder. The original directory is not known anymore, this way the target is always the Suspended folder.
If the speech-recognized dictation file was not a .dra file in the Archive folder, its state changes to Correction suspended, and only correction can be continued in the text. If the dictation file was a digital dictation file in the Archive folder, its state changes to Transcription suspended, and transcription of the file can be continued in SpeechExec Pro Transcribe.
Recover a dictation by following the instructions below: Select a dictation in the Archive folder or one of its subfolders (ARCH_yyyymmdd folders). You can recover only one dictation at a time, so if you want to recover more dictations, you have to do it one by one.
Check that the Suspended folder is available. If it is not available, an error message is displayed.
From the File menu choose Un-archive dictation...
The archived dictation is moved to the Suspended folder. Work can continue on the file according to its state.
Exit - shuts down SpeechExec.
Note
SpeechExec can now only be reopened from the Start menu.
Edit
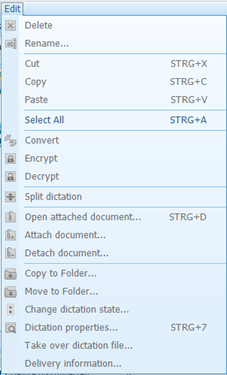
Delete - deletes the selected dictation, you must confirm your action. Whether this file is permanently deleted or moved to the Recycle Bin depends on your personal or preconfigured settings.
Rename - enables you to change the file name of the selected dictation.
Note
Renaming, encrypting or converting a dictation file that is already sent for offline speech recognition is not recommended. The modified dictation file will be rejected from speech recognition
Cut - cuts the selected dictation from the current folder to paste it into another folder.
Copy - copies the selected dictation from the current folder to paste it into another folder.
Paste - pastes the cut or copied dictation into the current folder.
Select All - Selects all dictations in the folder that you are viewing.
Convert - converts the selected dictation file to the configured audio format. If more than one file in your dictation list is selected, all files are converted. Encrypt - encrypts the selected dictation. You must enter and confirm an encryption password. You can select more than one dictation (CTRL and SHIFT keys).
Note
The Encryption settings option in General Settings does not have to be activated to use this menu command.
Decrypt - decrypts the selected dictation. You must enter the password used to encrypt the dictation.
Split dictation - nables you to split a selected dictation into several smaller overlapping parts with approximately equal lengths.
Note
This option is available if only one file is selected.
The splitting process has no effect on the original dictation files. Dictation splitting is not supported for encrypted files. The following non-encrypted formats are supported: DSS, DS2, and MP3.
Open attached document - opens the attached file of the selected dictation in the application in which the attachment was created.
Attach document - enables you to attach the selected file to the dictation. A copy of the selected file is saved in the SpeechExec user folder and renamed to the name of the dictation file. If the dictation already has a file attached, the user is asked to overwrite the existing file. A paper clip icon in the worklist indicates that a dictation has a file attached.
Note
Files with the extension .xml, .sfd, .dir, .dll, .exe, .bat and .com cannot be attached.
Detach document - enables you to remove an attached file from the dictation. Specify the drive and directory in which to store the file. The attached file is moved to the specified location and removed from the dictation.
Copy to Folder - enables you to copy the selected dictation to another folder. Select a folder in the displayed dialog and click OK. The dictation is now stored at both locations.
Move to Folder - enables you to move the selected dictation to another folder. Select a folder in the displayed dialog and click OK. The dictation is now stored at the new location.
Change dictation state - displays the Change Dictation State dialog, where you can change the state of the selected dictation. Select a state in the displayed dialog and click OK. The dictation is moved to the designated folder, for example if you change the state from Dictation suspended to Transcription pending, the dictation is moved from your Suspended folder to your Finished dictations folder. You also have the possibility to choose whether the dictation position should be reset or not. You can select your choice at the bottom of the dialog. If you select this checkbox, the dictation position will jump back to the beginning of the dictation. If you leave this checkbox empty, you can continue the dictation from the same position.
Note
This option is also available in the General Settings->Worklist -> File Operations menu.
You should be aware that changing the dictation state does not initiate follow-up tasks like automatic emailing or conversion. You can select more than one dictation (ctrl and shift keys) and change their state in one step. For example, if Digital Pocket Memo files, which were not finished with the EOL button but are ready for transcription, are downloaded, they have the dictation state Recording suspended. This means that you cannot open them until you change the dictation state to Transcription pending
Dictation properties - displays the Dictation Properties dialog. Here you can view and edit the properties.
Take over dictation file
Delivery information - displays delivery information (like 'Sent to') of the selected dictation.
Folder
Hide - hides the selected folder. The folder is not visible in the tree and is no longer available.
Note
To make a hidden folder visible can be done only from the Folders page of General Settings
Delete - deletes the selected folder after your confirmation.
Note
You can delete any folder that you have created yourself. If this option is unavailable, the selected folder cannot be deleted.
Rename - enables you to change the name of the selected folder.
Folder properties - displays the Folder Properties dialog. Here you can view and edit the properties.
Speech recognition
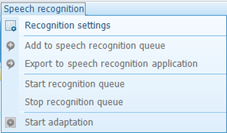
Recognition settings - Displays the Profile settings page of General Settings. Here you can enable speech recognition and define speech recognition settings.
Add to speech recognition queue - adds the selected dictation to the internal offline speech recognition queue. The queued dictations are visible in the Recognition and adaptation queue panel. This option is only available for Dragon NaturallySpeaking users.
Export to speech recognition application - exports the selected dictation to a speech recognition engine. For this option, a speech recognition engine must be installed.
Start recognition queue - starts processing the dictation files in the offline speech recognition queue in the Recognition and adaptation queue panel. This option is only available for Dragon NaturallySpeaking users.
Stop recognition queue - stops the offline speech recognition processing of the dictation files in the Recognition and adaptation queue panel. This option is only available for Dragon NaturallySpeaking users.
Start adaptation - starts adaptation of the speech recognition profiles based on the corrected dictation files. The desired adaptation method must be selected in the pop-up window. This option is only available for Dragon NaturallySpeaking users.
Settings
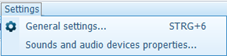
General settings - displays the General Settings dialog. Here you can make settings for your Worklist module, dictations, Digital Pocket Memo and Recorder module.
Sounds and audio devices properties - displays the Audio device settings dialog. Here you can make sounds, audio and hardware settings. To display the corresponding Microsoft Windows dialog, click on Sounds and audio devices properties.
View
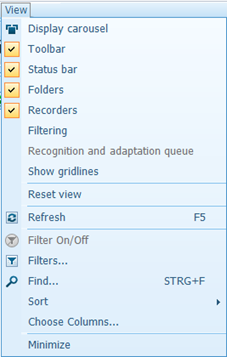
Opens the carousel window where dictation files are displayed as dictation cards. Each card contains information about the name of the dictation file, its related properties, its state and a button.
Note
The button is disabled if the selected dictation file is locked. A photo of the author can also be displayed on the card by defining its path on the Visibility page in General Settings. The color of a dictation card always reflects the current properties of a dictation file. By default, both the header and the body of the dictation card is blue. In case of dictation files with high priority status, the header of a card is red. The body of a dictation card is green in case of dictation files queued for speech recognition and grey if a file is locked. The currently selected dictation file in the middle of the carousel can be opened by either clicking on the button or pressing ENTER. Filtering or sorting in the Worklist influences the appearance of the dictation files in the carousel, too.
Note
Neither filtering nor sorting can be changed in the carousel
Toolbar - shows or hides the Toolbar.
Status bar - shows or hides the Status Bar.
Folders - shows or hides the dictation folders tree pane.
Recorders - displays or hides the Recorders pane, which shows the status of the last connected recorder device. For example, if you connect a DPM first and subsequently a SpeechAir device, then only the status of the SpeechAir device is displayed.
Filtering - shows or hides the Filtering panel. Here you can define filter conditions to display only items with specific properties.
Recognition and adaptation queue - shows or hides the Recognition and adaptation queue panel. This option is only available for Dragon NaturallySpeaking users.
Show gridlines - shows or hides the gridlines between columns and rows in the dictation list.
Reset view - resets the default layout of the main window.
Refresh - updates the information displayed in the dictation list for the currently open folder.
Filter On/Off - applies the configured filter to the dictation list. Select the menu command again to return to the unfiltered dictation list.
Filters - displays the Filters dialog. Here you can define filter conditions to display only items with specific properties.
Find - displays the Find dialog. Here you can search for the property values of the files currently displayed in the dictation list.
Sort - opens a menu with all available column headings in your dictation list. Select a column to sort your dictation list by the column.
Choose Columns - opens a menu with all available column headings in your dictation list. Activate the corresponding checkbox to display a column, clear the checkbox to hide a column.
Minimize - Minimizes the Worklist to a button on the Windows taskbar.
Note
This option is not available in a Windows Terminal server and Citrix environment.
Help
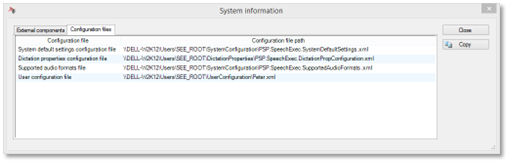
Displays system information, for example, the location of used configuration files and third party components used by the application.