SpeechLive Desktop App
To use the SpeechLive Desktop App in remote / enterprise environments you need to install components on the Target as well as the Client.
Please follow the instructions below for a more detailed guide about those components and how to install them on the  Target as well as the
  Client. We also recommend to consult the Introduction section, to learn more details about the terminology and some basics about USB devices in virtual environments.
Target
Disable Citrix API Hooks:
To use the SpeechLive Desktop App in Citrix you need to add an exclusion for the CTX hook:
Open the Registry Editor and go to
HKEY_LOCAL_MACHINE\SYSTEM\CurrentControlSet\services\CtxUvi.Add Philips Speech; to the UviProcessExcludes key.
Restart the virtual machine.
Note
In this article you can find more in-depth information on how to disable Citrix API Hooks.
Download the SpeechLive Desktop App on your computer.
Click here to download the app for Windows (.exe version, recommended for most users)
Click here to download the app for Windows (.msi installer).
Note
If the setup fails, make sure that temporary folders where successfully created during the installation process:
Check the Squirrel install logs, inside the logs you will find the temporary path that the installer wanted to use. The path will likely contain a numbered folder, for example 'C:\Window\Temp\[placeholder]\2\[placeholder]'
The installer failed to create the '\%number%\' folder (e.g. ‘\2\’). Create the folder manually, and run the installer again.
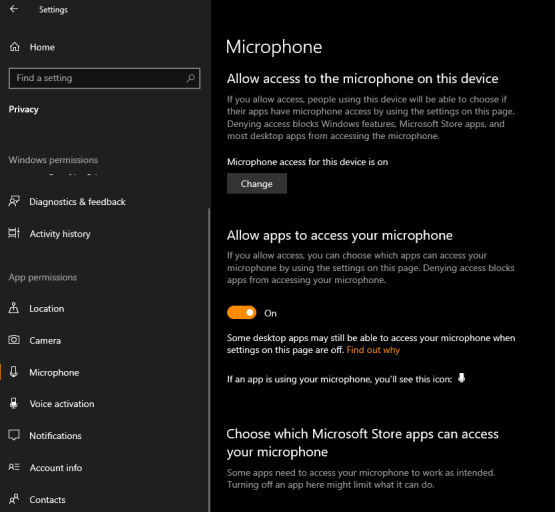
Make sure that microphone access is turned on in the App permissions
Download the SpeechLive Desktop App on your computer.
Click here to download the app for Windows (.exe version, recommended for most users)
Click here to download the app for Windows (.msi installer).
Note
Make sure that microphone access is turned on in the App permissions
In order to use any microphone, you need to have RDS (Remote Desktop Services) enabled on the target side.
Either change the settings of your current configuration or add them:
In the Server Manager go to Configure this local server and choose Add roles and features.
During the installation wizard, choose Role-based or feature based installation and then your server. On the Server Roles screen, activate Remote Desktop Services and continue the wizard.
On the Role Services screen, activate Remote Desktop Connection Broker, Remote Desktop Gateway, Remote Desktop Session Host, and Remote Desktop Web Access.
Continue with the wizard until you can click Install and restart your server after the installation.
Download the SpeechLive Desktop App on your computer.
Click here to download the app for Windows (.exe version, recommended for most users)
Click here to download the app for Windows (.msi installer).
Note
Make sure that microphone access is turned on in the App permissions
Client
Windows clients
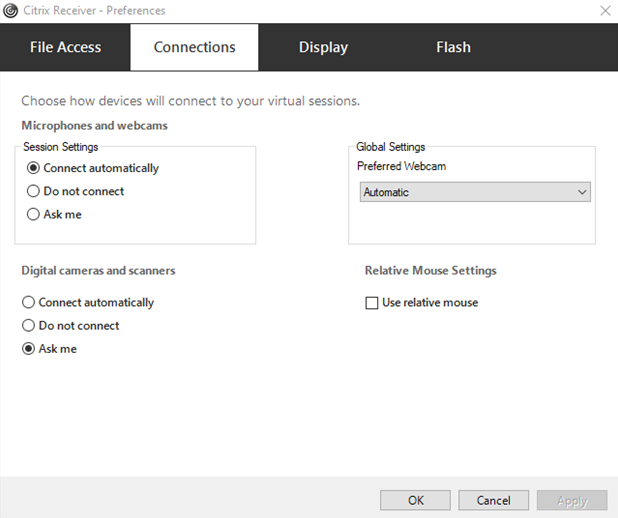
Install the Citrix Receiver/Workspace app and allow microphones in the Citrix Receiver:
From the Philips Speech Extensions package, run
\2_Windows_clients\philips_client_extension_setup.exe.
philips_client_extension_setup.exe automatically installs all required Philips client extensions.
Note
Do not install Philips client extensions if you configured your virtualization platform (Citrix, VMware…) to fully redirect USB devices. The Philips SDKs on the target side will detect missing client extensions and automatically switch to a local use case, which fits the full USB redirection approach perfectly.
Only when DPMs are used: the DPM drive is mounted to
C:\SPSMOUNTon both client and server/target. For changing the mounting paths, use philips_client_extension_setup.exe command line setup.
For Enterprise environments, it´s possible to run philips_client_extension_setup.exe via command line. The following parameters are supported:
Parameter | Description |
|---|---|
| Path to which DPMMounterService mounts the DPM drive on the client |
| Path to which DPMMounterService mounts the DPM drive on the target/server |
| Silent installation (no UI) |
| Uninstall |
| Repair |
| Log combined setup. This is path to a file. The folder must exist. |
| Log embedded setups. This is a path to a folder. The folder must exist. The embedded setup for the 32 bit components logs to "{ 7B0CAB42-FEAA-43B2-9261-99C4F12F3B42 }.log" The embedded setup for the 64 bit components logs to "{ 50C19A9C-0E96-42F3-9C44-8E72D13F9479 }.log" |
Examples:
Silent setup with default values: philips_client_extension_setup.exe /silent
Silent setup with custom mounter paths: philips_client_extension_setup.exe /silent DPM_LOCAL_PATH="C:\DPM" DPM_SERVER_PATH="C:\DPM"
Enable audio pass through in your VMware Horizon Client.
From the Philips Speech Extensions package, run
\2_Windows_clients\philips_client_extension_setup.exe.
philips_client_extension_setup.exe automatically installs all required Philips client extensions.
Note
Do not install Philips client extensions if you configured your virtualization platform (Citrix, VMware…) to fully redirect USB devices. The Philips SDKs on the target side will detect missing client extensions and automatically switch to a local use case, which fits the full USB redirection approach perfectly.
Only when DPMs are used: the DPM drive is mounted to
C:\SPSMOUNTon both client and server/target. For changing the mounting paths, use philips_client_extension_setup.exe command line setup.
For Enterprise environments, it´s possible to run philips_client_extension_setup.exe via command line. The following parameters are supported:
Parameter | Description |
|---|---|
| Path to which DPMMounterService mounts the DPM drive on the client |
| Path to which DPMMounterService mounts the DPM drive on the target/server |
| Silent installation (no UI) |
| Uninstall |
| Repair |
| Log combined setup. This is path to a file. The folder must exist. |
| Log embedded setups. This is a path to a folder. The folder must exist. The embedded setup for the 32 bit components logs to "{ 7B0CAB42-FEAA-43B2-9261-99C4F12F3B42 }.log" The embedded setup for the 64 bit components logs to "{ 50C19A9C-0E96-42F3-9C44-8E72D13F9479 }.log" |
Examples:
Silent setup with default values: philips_client_extension_setup.exe /silent
Silent setup with custom mounter paths: philips_client_extension_setup.exe /silent DPM_LOCAL_PATH="C:\DPM" DPM_SERVER_PATH="C:\DPM"
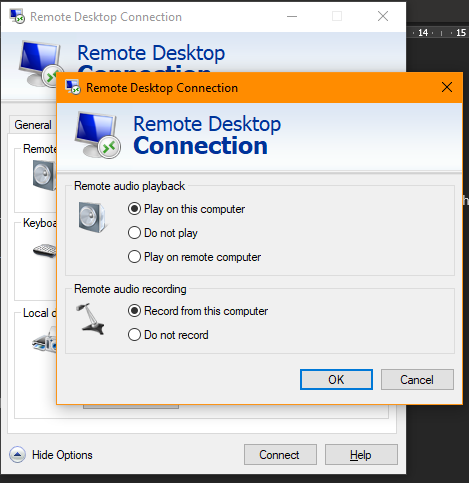
Open the advanced settings menu in your Remote Desktop Connection window and navigate to the tab where you find the Remote audio setting.
Activate the Record from this computer settings:
From the Philips Speech Extensions package, run
\2_Windows_clients\philips_client_extension_setup.exe.
philips_client_extension_setup.exe automatically installs all required Philips client extensions.
Note
Do not install Philips client extensions if you configured your virtualization platform (Citrix, VMware…) to fully redirect USB devices. The Philips SDKs on the target side will detect missing client extensions and automatically switch to a local use case, which fits the full USB redirection approach perfectly.
Only when DPMs are used: the DPM drive is mounted to
C:\SPSMOUNTon both client and server/target. For changing the mounting paths, use philips_client_extension_setup.exe command line setup.
For Enterprise environments, it´s possible to run philips_client_extension_setup.exe via command line. The following parameters are supported:
Parameter | Description |
|---|---|
| Path to which DPMMounterService mounts the DPM drive on the client |
| Path to which DPMMounterService mounts the DPM drive on the target/server |
| Silent installation (no UI) |
| Uninstall |
| Repair |
| Log combined setup. This is path to a file. The folder must exist. |
| Log embedded setups. This is a path to a folder. The folder must exist. The embedded setup for the 32 bit components logs to "{ 7B0CAB42-FEAA-43B2-9261-99C4F12F3B42 }.log" The embedded setup for the 64 bit components logs to "{ 50C19A9C-0E96-42F3-9C44-8E72D13F9479 }.log" |
Examples:
Silent setup with default values: philips_client_extension_setup.exe /silent
Silent setup with custom mounter paths: philips_client_extension_setup.exe /silent DPM_LOCAL_PATH="C:\DPM" DPM_SERVER_PATH="C:\DPM"