Philips SpeechExec Enterprise - 8.0 and later
Follow the steps in the following sections to install the drivers on both the  Target and the
  Client. You can find more details about the terminology and some basics about USB devices in virtual environments in the Introduction section.
Target
Nothing to set up on the target side. Target side extensions are already integrated to the setup of SpeechExec Enterprise version 8.0 or later.
If you´re upgrading from a previous version of SpeechExec Enterprise, it is recommended to uninstall old Philips Speech server extension drivers if they are no longer used by other products on this PC. The best way to do that is by downloading the Philips Speech Extensions package and run \3_SDK_upgrade_patch\registered\philips_sdk_upgrade.exe.
By running philips_sdk_upgrade.exe a multitude of factors are checked and executed:
Old Philips Speech server extensions are removed.
All registered Philips Hardware SDK components are upgraded.
These new components inherently contain the server side control extensions (for buttons and LEDs) and auto-detect whether you´re running Citrix, VMware, WTS/RDP or locally. The local use case is detected in case no Philips client extensions are installed, which might be useful in case of full USB redirection.
Note
If other software relying on old Philips Speech server extensions is running on this machine, philips_sdk_upgrade.exe might break Philips dictation device related remote session functionality of that software under following circumstances:
That other software is integrating Philips Hardware SDK (e.g. SpeechMike SDK) and
Philips Hardware SDK is integrated by that other software in a side-by-side fashion and
Philips Hardware SDK´s version used by that other software is lower than 4.4.441
You would notice that in such a software, button events would not arrive anymore (among other Philips dictation device related functionalities). You can fix this by following these steps:
Find the installation path of the other software. Locate folders named
Philips.SpeechMikeorPhilips.DPMControlor both right next to the application´s executable.Copy files from
\3_SDK_upgrade_patch\sxs\[bitness]\[used SDK]to the respective folders. The bitness must match the other software´s bitness.
For Enterprise environments, it´s possible to run philips_sdk_upgrade.exe via command line. The following parameters are supported:
Parameter | Description |
|---|---|
| Silent installation (no UI) |
| Uninstall |
| Repair |
| Log combined setup. This is path to a file. The folder must exist. |
| Log embedded setups. This is a path to a folder. The folder must exist. The embedded setup for the 32 bit components logs to "{100D881C-DF57-4F34-AD13-F7D6091B6B3B}.log" The embedded setup for the 64 bit components logs to "{700565C9-248D-46D7-AD5F-D3AC8F62D203}.log" The embedded setup for the SpeechAir SDK upgrade logs to "{7C9D3AC6-3674-4F3C-9CF4-BBABB21F57B4}.log" |
Note
If philips_sdk_upgrade.exe run via command line does not find any Philips components to be upgraded, it will not install anything and exit.
Client
Philips Speech Extensions are supported on many different clients, choose the one matching your environment:
Windows clients
From the Philips Speech Extensions package, run \2_Windows_clients\philips_client_extension_setup.exe.
philips_client_extension_setup.exe automatically installs all Philips client extensions required for your specific client platform, regardless if it´s 32 or 64 bit, or if you're using Citrix, VMware or WTS/RDP.
Note
If you´re running Citrix, it is required to install the Citrix Receiver/Workspace app prior to
philips_client_extension_setup.exe.Do not install Philips client extensions if you configured your virtualization platform (Citrix, VMware…) to fully redirect USB devices. The Philips SDKs on the target side will detect missing client extensions and automatically switch to a local use case, which fits the full USB redirection approach perfectly.
Only when DPMs are used: the DPM drive is mounted to
C:\SPSMOUNTon both client and server/target. For changing the mounting paths, use philips_client_extension_setup.exe command line setup.
For Enterprise environments, it´s possible to run philips_client_extension_setup.exe via command line. The following parameters are supported:
Parameter | Description |
|---|---|
| Path to which DPMMounterService mounts the DPM drive on the client |
| Path to which DPMMounterService mounts the DPM drive on the target/server |
| Silent installation (no UI) |
| Uninstall |
| Repair |
| Log combined setup. This is path to a file. The folder must exist. |
| Log embedded setups. This is a path to a folder. The folder must exist. The embedded setup for the 32 bit components logs to "{ 7B0CAB42-FEAA-43B2-9261-99C4F12F3B42 }.log" The embedded setup for the 64 bit components logs to "{ 50C19A9C-0E96-42F3-9C44-8E72D13F9479 }.log" |
Examples:
Silent setup with default values: philips_client_extension_setup.exe /silent
Silent setup with custom mounter paths: philips_client_extension_setup.exe /silent DPM_LOCAL_PATH="C:\DPM" DPM_SERVER_PATH="C:\DPM"
Linux clients
Please specify which operating system your client is running:
Philips extensions are natively integrated into IGEL OS 10 and IGEL OS 11. Please contact IGEL support for more information about the release plan (which version of Philips extensions is integrated in which version of IGEL OS).
Note
Philips extensions support only Citrix and RDP sessions from IGEL clients.
To enable Philips extensions on IGEL in Citrix environments, go to IGEL Setup -> Sessions -> Citrix -> Citrix Global -> Mapping -> Device Support and checkmark Philips speech channel for dictation.
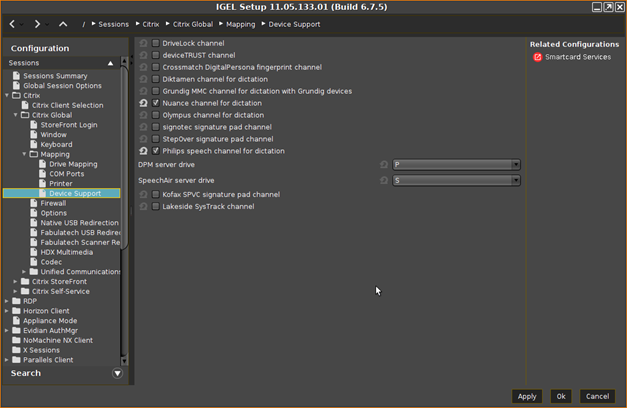
Additionally, if you´re using DPM devices, you can configure the drive mapping right below that checkbox.
To enable Philips drivers on IGEL in WTS/RDP environments, go to IGEL Setup -> Sessions -> RDP -> RDP Global -> Mapping -> Device Support and checkmark Enable Plugin Support and Philips speech channel for dictation.
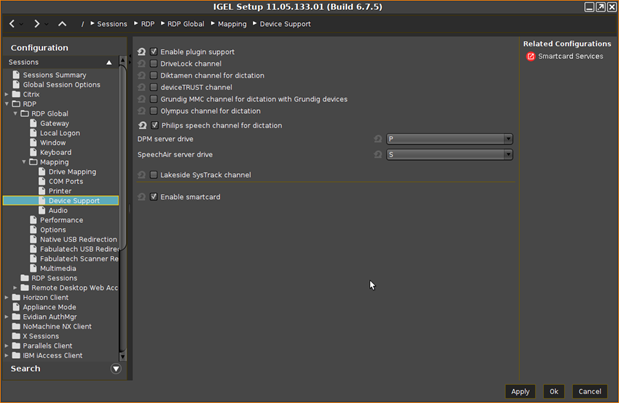
Additionally, if you´re using DPM devices, you can configure the drive mapping right below that checkbox.
Foot control button assignment
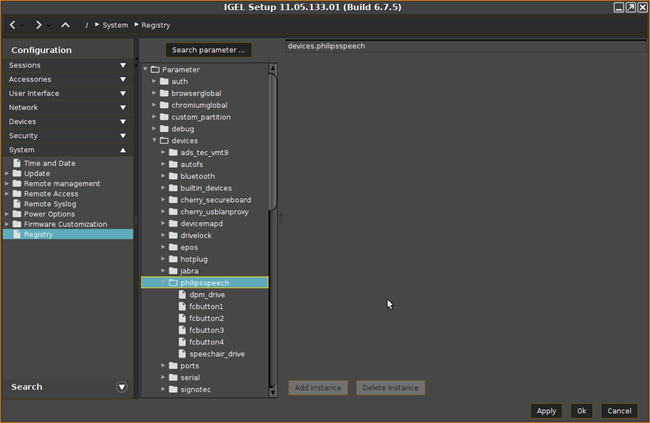
For changing the Foot control button assignment, go to IGEL Setup -> System -> Registry -> devices -> philipsspeech
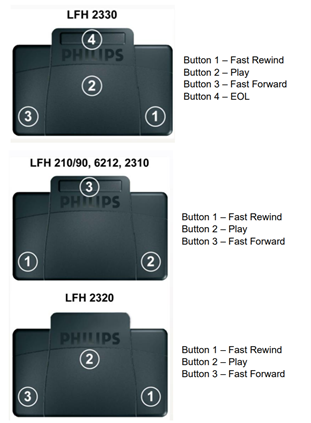
Default values:
Button function | Button | Value Decimal |
|---|---|---|
Fast rewind | 1 | 12 |
Play (Press and Hold) | 2 | 4 |
Fast forward | 3 | 14 |
EOL | 4 | 10 |
Known issues
On IGEL UD3-720 and UD5-720 devices, recording in quality play (dictation.ds2) does not work. There are indications that the cause for that behavior is in the built in audio mixer of the operating system, which takes too much CPU performance.
As only UD3 and UD5 where physically available during release testing it might turn out that other devices face the same issue.
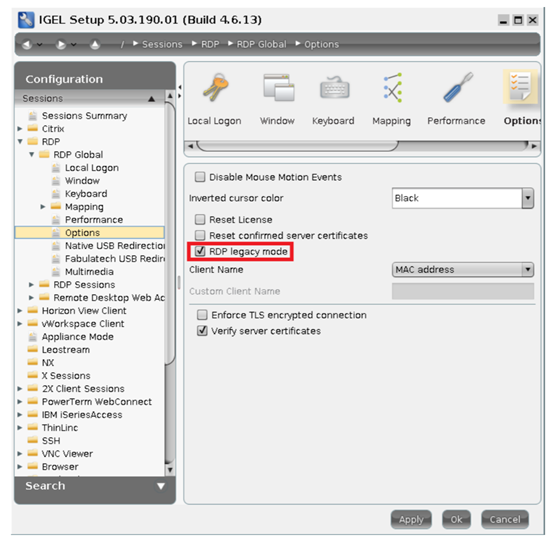
When opening an RDP session on an IGEL UD 5.x client it might happen that DPM related functions do not work properly. This problem is related to the Igel RDP client 2.1. To resolve this issue, open the IGEL setup, go to RDP -> RDP Global -> Options and enable RDP legacy mode:
Note
Philips extensions support only Citrix and RDP sessions from eLux clients.
Please remove all older Philips extensions before installing the new version.
Start the ELIAS tool (can be downloaded from www.myelux.com) and create a new image.
Download the Philips Speech Extensions package and import Philips extensions from the folder
\2_Linux_clients\Unicon.Alternatively, you can download Philips extensions directly from the eLux website www.myelux.com.
Add the Philips extension package to the Defined packages area.
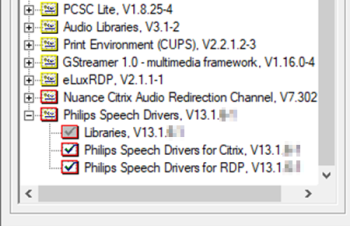
Right-click and activate the protocol you want to use, all additionally required packages (for example, the ICA client) will be added automatically:
Upgrade the thin clients with the new image.
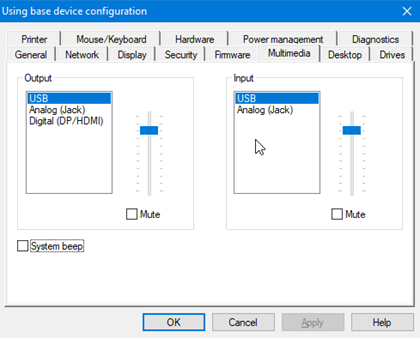
In Scout Enterprise, ensure that Input USB devices are not muted:
Foot control button assignment
For changing the Foot control button assignment, Change the /etc/PhilipsSpeech/Settings.ini on the client.
Default values:
Button function | Button | Value Decimal |
|---|---|---|
Fast rewind | 1 | 12 |
Play (Press and Hold) | 2 | 4 |
Fast forward | 3 | 14 |
EOL | 4 | 10 |
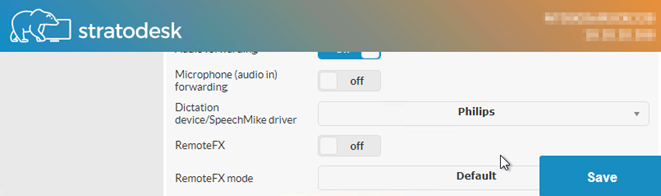
The Stratodesk noTouch operating system already has the Philips extension drivers implemented, they must be enabled in the configuration menu.
Note
Philips drivers support only Citrix and RDP sessions from Stratodesk clients.
To enable Philips extensions on Stratodesk NoTouch OS in Citrix environments, go to System configuration -> Connections -> <your Citrix connection> -> Citrix -> Citrix Workspace App -> Dictation device/SpeechMike driver and select Philips.
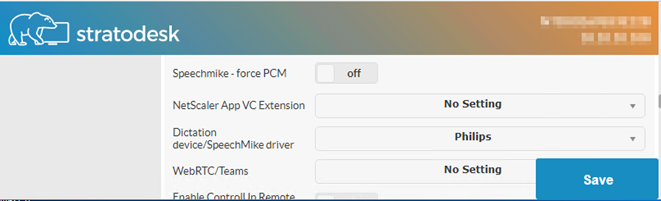
To enable Philips extensions on Stratodesk NoTouch OS in RDP/WTS environments, go to System configuration -> Connections -> <your FreeRDP connection> -> FreeRDP -> Dictation device/SpeechMike driver and select Philips.
Foot control button assignment
For changing the Foot control button assignment, Change the /etc/PhilipsSpeech/Settings.ini on the client.
Default values:
Button function | Button | Value Decimal |
|---|---|---|
Fast rewind | 1 | 12 |
Play (Press and Hold) | 2 | 4 |
Fast forward | 3 | 14 |
EOL | 4 | 10 |
Note
Philips extensions support only Citrix sessions from Ubuntu clients. VMware or WTS/RDP is not supported.
Philips Speech extensions are supported and tested on Ubuntu 18.04 and Citrix Workspace App, you might run into issues on other versions.
Make sure an ICA Client (version 12.x or newer) is installed.
Download the Philips Speech Extensions package and copy
\2_Linux_clients\Ubuntu\x64\PhilipsSpeechDriversLinuxSetupUbuntu.shto a folder on your client.Make the file executable (
chmod +x)Open a terminal window and check if a
wfclient.iniexists in/opt/Citrix/ICAClient/config(or your installation path) – if not, create one by copying the existing template usingsudo cp /opt/Citrix/ICAClient/config/wfclient.template /opt/Citrix/ICAClient/config/wfclient.iniChange to folder where the
.shfile is locatedInstall the drivers running following command
sudo ./PhilipsSpeechDriversLinuxSetupUbuntu.sh --default_hiddev_dir /dev/usb/ --default_joydev_dir /dev/input/ --ica_dir /opt/Citrix/ICAClientDistribute the updated
wfclient.inias required
Foot control button assignment
For changing the Foot control button assignment, Change the /etc/PhilipsSpeech/Settings.ini on the client.
Default values:
Button function | Button | Value Decimal |
|---|---|---|
Fast rewind | 1 | 12 |
Play (Press and Hold) | 2 | 4 |
Fast forward | 3 | 14 |
EOL | 4 | 10 |
If your Linux system is not IGEL or Stratodesk and it is not listed in section Platforms tested by Thinclient vendors (Supported platforms) , it is very unlikely that Philips Speech Extensions are integrated into the system. In this case, you have the following options to get Philips dictation hardware like SpeechMike or Foot control working on your client:
Check whether your system provides Full USB Redirection or Device Splitting methods and use that to redirect Philips hardware
Try to set up Philips extensions yourself by using (and probably modifying) the Ubuntu script (see Ubuntu)
Ask the client vendor to integrate Philips extensions natively
Note
If you are a Thinclient vendor and you are willing to integrate Philips extensions into your OS/firmware, please contact us via support.speech.com.